qbsenterprisesupport's blog
For any company, payroll accounting is a big deal. QuickBooks accounting software comes to the rescue while calculating the payment of employees. However, QuickBooks catches few errors in different circumstances of operation. Neglecting these issues will have negative consequences. QuickBooks error 15107is one of the issues that occur when upgrading or installing QuickBooks payroll updates. This problem displays the message "QuickBooks error 15107: The payroll cannot be initialised."
If you are experiencing the same issue and seeking solutions, you have come to
the right place. This blog post will assist you in resolving the mistake and
operating the QuickBooks software efficiently.
What
may cause the QuickBooks error 15107?
There are various reasons why payroll error 15107 appears on a computer screen
while updating QuickBooks accounting software.Even
small mistakes can trigger the error. Before looking to rectify the errors,
it’s important to know the root causes. Here we have mentioned a few major
reasons are as:
- Windows operating systems
and QuickBooks are outdated
- Payroll files and registry
entries are corrupted or damaged
- QuickBooks are not installed
properly
- The computer is attacked by
malicious activities and viruses.
- In some instances,
third-party applications run behind the screen and can disrupt the
QuickBooks operation
- If there is no internet
connection
- Firewall and security
settings were not configured properly and might block the connection.
Now you are aware
of what QuickBooks error 15107 is and the factors that trigger the
problem. And you are set to try for troubleshooting methods. However, before
that make sure to follow the instructions without any mistakes.
·
First close QuickBooks Desktop
software.
·
Right-click on the QuickBooks icon on
your desktop screen
·
Select "Properties" from
the menu.
·
Click on "Open File
Location."
·
In the top right search field, type
"reboot" or "reboot.bat."
·
Once you find the file named
"reboot" or "reboot.bat," right-click on it.
·
Choose "Run as
administrator" from the context menu.
·
Click on "Yes."
·
Now restart your computer to apply
the changes
·
Relaunch the QuickBooks Desktop
·
If it asks to install an update,
select "Update Now."
·
If the error continues, go to the
next troubleshooting method.
·
First install the QuickBooks clean
install tool.
·
Select QuickBooks Clean Install
Utility.exe.
·
Now Open the setup file
·
A permission box will appear; click
"I accept" to agree to the license agreement.
·
Select the "Continue"
button.
·
Click on "OK" to finalize
the process.
Sometimes users have to move their data between different QuickBooks company files. The process is very simple and you can transfer your data within a short period. This migration process can be done using the QuickBooks data migration tool. But sometimes, the error occurs showing the message that “QuickBooks migration failed unexpectedly” which will make the user panic as it restricts the file transfer and this might lead to data loss.
Therefore, resolving this error is essential for the QuickBooks user. Here in this article, we have mentioned the solutions for fixing the issue to continue for successful data migration process.
Causes of QuickBooks migration failed unexpectedly issueKnowing the causes of QuickBooks errors is very important to resolve earlier. Below we have mentioned the reasons for QuickBooks migration failure.
- You will encounter QuickBooks data migration failure if the QuickBooks version is not updated.
- If the QuickBooks version on your computer is not compatible with your current files QuickBooks migration will not process properly.
- QuickBooks data migration failure message occurs if the operating system’s files are corrupted.
- Data migration is unsuccessful, if necessary, files are lost or corrupted.
- Misconfigured Windows operating system might cause issues during data migration.
- Transferring your company’s data may fail if the folder comprising the QuickBooks file is corrupted or if the folder path is damaged.
- Upgrading your Windows OS to the most recent version might impede QuickBooks operation and lead to QuickBooks migration failure.
Well, you have understood the causes of the QuickBooks migration error. Now it is the time to know the steps involved in rectifying the error. Let us elaborate on each of the methods for fixing this error permanently:
Move QuickBooks files to a different location- Copy your backup files to the new location of the system. So, follow the below procedures
- First open the folder which is having QuickBooks files
- Right-click on the below-mentioned files and choose the copy option
- Cash flow Projector
- Printer Settings
- QB Letters
- Financial Statement Designer
- QB Templates
Paste all the above files to another location.
Repair the Company FilesFrequently you might be able to fix the QuickBooks desktop migration tool error if you repair the company files. To do this:
You can resolve QuickBooks desktop migration failure errors by repairing the company files.
- Install QuickBooks on your new system.
- Open QuickBooks on your old system
- Open the file menu and switch to single mode

- Within the File menu, select the option for Company Backup.
- Choose 'Create Local Backup.'
- Specify the folder where you wish to store the backup files.
- Hit 'OK,' then click the 'Save,' button and finally 'Finish' to complete the backup process.
- Transfer these backup files to your new system.
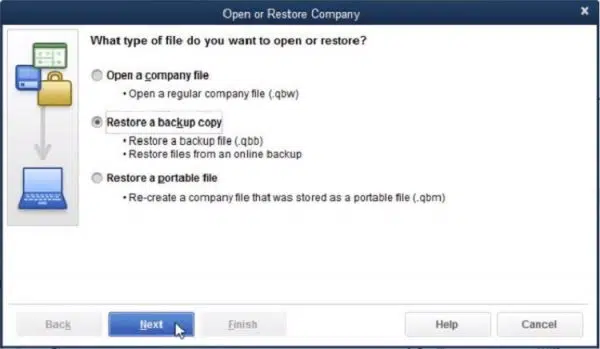
- Launch QuickBooks on the new system and go to the File menu, then select 'Restore the backup file.'
- Once the process is completed, try for the QuickBooks migration once again
- First open QuickBooks.
- Press the F2 key to go to the product information window.

- Scroll to the file information section and check the current location.
- Once you have noted the location close the QuickBooks app
- Click the Start button and open the file manager
- Go to the location of the company file in the file manager.
- Right-click on the company file folder and choose the copy option.
- Finally, paste the copied files into a different location by pressing the Ctrl + V keys.
Are you a user of QuickBooks? Curious about the way as to how to restore the backup files in QuickBooks desktop? Don’t worry! This tech blog will help you out with all your issues and queries. It is very important to create backups of the company files to be on the safer side in case the data gets damaged, corrupted or lost somehow.
But, with backups in your hand, you are free to sit back and relax, all tension free! That is why, it is very important to know the proper manner to create backups and the procedures to restore the backup files in QuickBooks Desktop.
When do the Situations for Backup requirements arise?At times, it becomes utmost necessary to know and understand the situations as to when and how one can get backup requirements. Many situations may arise when the QuickBooks user may require to restore the backup file. Some of the situations are as follows:
- The first situation may be like when the company file is troubled by any kind of Malware or Virus. In that case, it becomes possible that all the user data of QuickBooks gets removed from the system.
- Another situation may be like, at times the company file may get damaged to such an extent, that it may become next to impossible to rebuild the data with the help of QuickBooks Verify and Rebuild Data Utility.
- If the user accidently deletes the company data, in such a scenario, backup requirements arise.
The user needs to follow certain steps to create backup of the company files. Following are the steps by which the user can create the backup.
- First of all, the user has to go to the File menu.
- Then, choose the Backup Company.
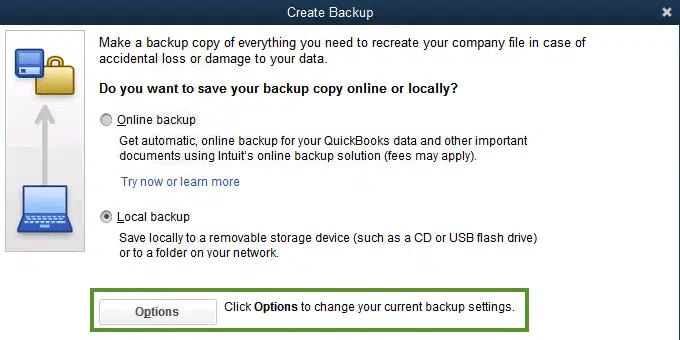
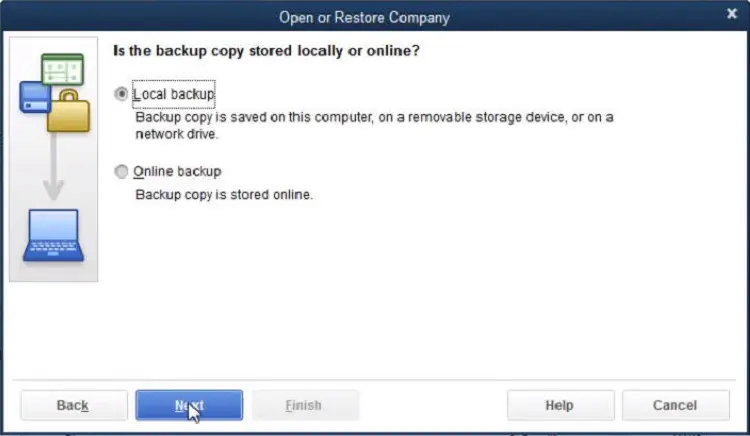
- In the next step, select the Local Backup that appears on the screen.
- The user needs to choose the location where he/she wants to save the file.
- The user needs to browse the folder or location.
- In the next step, the user has the provision to save the backup on any local devices or browse.
- Then, he / she have to save the file on an external device. The external device may be anything. It can be an external Hard drive or Thumb Drive.
- Next, the user has to follow the ways to create the Setup Preferences. The steps to create the Setup Preferences are as follows:
- First of all, the user needs to choose to add the Date and Time of the backup file.
- Then, he /she have to set the limit number of backups which they want to keep at a certain point of time.
- Next, along with the preceding steps, the user can set the reminder for creating a backup up of the company file.
- After that, the user has to choose the option to verify that the data of the company file is correct when they save it. The complete necessary verification is prompted to the user with a message.
- Next, the user has to confirm whether he / she wants to save the file on the local device. The user needs to click Yes and then click on Next.
- Then, the user has to select either of the options: “Now” or “Now and Schedule Future backup”. The user must choose the 2nd option.
- Once this is done, the user will be asked to schedule a backup of the file in either in the two ways:
- While closing the file, set a backup a certain number of times.
- Set up a backup on a schedule as recommended.
QuickBooks program often suffers from different forms of error codes. One such error that shall be discussed in this blog is QuickBooks Error 2000. Due to this error, many accounting features of QuickBooks may not be accessible due to this error.
This issue may even stop payroll from running. Users should read this article all the way through to learn about the several methods to fix QuickBooks error 2000.
What provokes QuickBooks Payroll error 2000?- QuickBooks Payroll Error 2000 can be the consequence of a data transmission failure.
- An issue with the network may cause such payroll error.
- If QuickBooks is unable to get the most recent data from the server, the error may pop up.
- If the account information got changed and the server is unable to recognize the changes, error 2000 may appear.
- Using an outdated version of QuickBooks Desktop.
- It's possible that the essential.ini files related to QuickBooks got corrupted or damaged.
Following are the DIY methods to rectify the QuickBooks error code 2000:
Method 1: Provide correct Banking Credentials- Access your bank website and head to the login page.
- Enter the right login information to access your account.
- If you entered your password erroneously or entered your login credentials carelessly, try again.
- Click the Forget password link if you are still unable to log in. To regenerate or reset your password, adhere to the on-screen instructions.
- Verify the resolution of the QuickBooks Payroll Error 2000
- Download and install the QuickBooks Tool Hub from Intuit.
- Open the Tool Hub now.
- Choose the QuickBooks Install Diagnostic Tool from the Installation problems menu.
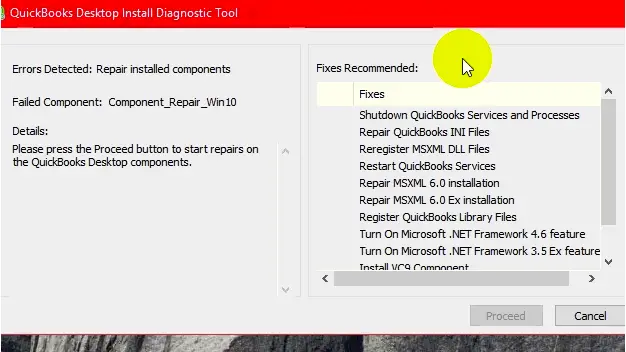
- Wait for the procedure to be finished. Once the process is finished, verify that QuickBooks Error 2000 has been resolved.
Conclusion!
A more recent addition to the list of technical errors experienced in QuickBooks is the payroll error 2000. Our experts have covered all the necessary methods to fix QuickBooks Payroll Error 2000 in this post. In case the problem still persists on your system then you have to take assistance from the QuickBooks customer support team. Our experts will not only fix the issue but also guide you to avoid such errors in the near future. Users can straightaway give us a call straight away at the helpdesk 1-800-761-1787.
